Fairy Friends University Adding Accessories/Jewelry & Glitter/Sparkle Tutorial
(C) to Deana Owens and FFU ~ 2006.
Do not give out link or share with others.
~Below is the sparkle tube you need for this
lesson,
please click on link to download.
 In this lesson you will learn how to paint your own accessories/jewerly on your doll. You will also learn how to glitter it and add sparkles.
Read this entire lesson prior to beginning then you can come back and follow it as you start.
First pick a doll body, head and a back to work with. Then put them on one psp file, but each on its on layer.
Place your back, doll and head as you want it to look once finished, but keep them on their own layers.
Then X out the doll head layer. Now choose your paint brush tool using the settings I have below.
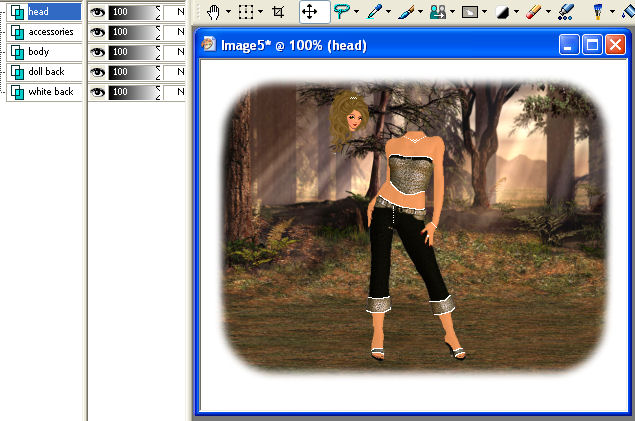
You can see my doll body with the head to the side in the image below. The next image will show where I
painted my accessories/jewelry on body and clothes. When you start to add your accessories and jewelry
make sure you put them on their own layer. You can see in my image below that shows where I painted on the
accessories and jewerly. Once your statisfied with it, then view your doll head and make sure it is where you want it.
The doll head should be on your top layer, then your painted accessories/jewelry, then your body, then your back and on
the very bottom your white background if you choose to use white as in my image below.
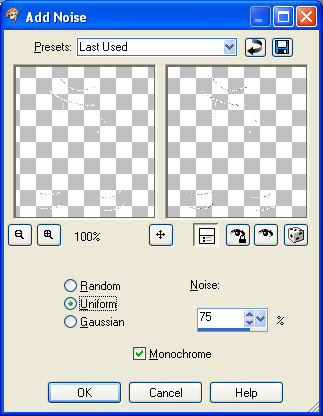
Now duplicate the accessories/jewelry layer you just painted. Now were going to add the
noise effect, go to adjust, then add noise. You can see the settings I used for noise below.
Add the noise at 75 to each layer. Then merging down, merge the body to the back layer, then merge that to
the white bottom layer. Now duplicate the head layer two times. Now as any doll tag you would merge a back ground layer with
the body, with the accessories and jewerly, and the head. Make sure the head layer stays above the accessories and jewerly.
You may also do it differently, if you want a doll head that has lots of hair, you may duplicate that head layer prior to merging anything,
using the tutorial for hair and neck placement, pull one head layer below the body layer and merge it with the body. Then erase any hair
off the top layer that you do not want on top of the body prior to painting your accessories.
With the sparkle tube I have given you above to download. Import into your picture tubes and name it 1 sparkle.
Now you may use the sparkle to add to any of the accessories you painted on or hair piece and jewerly on doll head.
You can see the settings I used for the sparkle tube below.
If you want to add noise to the head and jewerly pieces already on doll head, use this same tut, but what you should do is make a new layer
on top of the doll head and paint the jewerly and hair piece as it is on the doll head or add it to where you want it,
remember the zoom in tool is your best friend while doing this.
Then you can duplicate it 2 times and add the noise as you added to the accessories and jewerly and
merge each layer with the rest of the body. Be sure you always end with the three layers. If you accidentally merge
more together than you wanted to, just use your undo button to get it back to where it should be.
Then continue on. Once your done turn your animated doll into your teacher.
You can see my results with adding noise, one without sparkles added and one with sparkles added. Enjoy!
My Body and Image Prior to Painting Accessories

My Paint Brush Tool Settings

My Doll with Layer of Painted Accessories
As you can see my named layers to the left of the doll image.
My Noise Settings
My Doll With Noise Added to the Accessories
My Doll With Noise and Sparkels Added to the Accessories

|